Free Boat Plans Stitch And Glue Uv
Substantially a most appropriate as well as many cheap would Free Boat Plans Stitch And Glue Uv Free Boat Plans Stitch And Glue Uv Free Boat Plans Stitch And Glue Uv Free And Glue Boat Uv Plans Stitch be a effectively-recognized stitch together with glue process. You operate immeasurable debonair batch so you will slice a glued public as well as get 5 particular ribs per steaminggluing cycle. Changeable upon to a wheels, an imagination value carrying fun with as well as remembering.

Maybe not. Couldn't find the answers anywhere in the design forums. And I could be looking to do something that is pretty impractical.
My Goal. To build a simple two person outrigger Canoe using stitch Stitch And Glue Boat Building Videos Jump and glue with a thin, fairly bendable Free Boat Plans Stitch And Glue Uv steamed -likely plywood. Since Outrigger canoes attain stability via the Ama and Iako set up, the boat can be pretty narrow beam of 20 inches and does not need a hard chine for stability. Think of the rowing shells you see on the river, Free Boat Plans Stitch And Glue Uv Free Plans Uv And Boat Glue Stitch pencil thin super fast hull design. Then think, maybe not that pencil thin but.. Displacement ish. Rocker - Very little.
What seems like would be a simple approach would be to design it in something like Stitch and Glue light, print out the Free Boat Plans Stitch And Glue Uv plans and go build a model to experiment with. The problem is that Stitch and glue light charges for those plans.
In addition, it doesn't seem to allow you to choose how many pieces you would like in the output. Since I plan Free Boat Plans Stitch And Glue Uv to bend the ply quite a bit I hope to avoid having too many chines in the final construction.
Ideally I would love a completely smooth hull, with no chines. No chines, smooth hull. Could you actually go as far as to have two Free Boat Plans Stitch And Glue Uv Free Boat Plans Stitch And Glue Uv Free Boat Plans Stitch And Glue Uv long panels and book end them with the right cut and bend to come up with a painfully simple construction process with only one stitch location at the centerline? I have been playing with Freeship and like how powerful it is but I don't think I understand how I can get an output out of it that takes me to the next step of building it from plywood. Admittedly, I am new to Freeship and may have not discovered how the software makes this happen just Free Boat Plans Stitch And Glue Uv Free Boat Plans Stitch And Glue Uv yet.
Instead of spending a few more hours experimenting with the software, reading manuals etc I thought I would just ask the experts I have also looked at the Hull program but Looks like it only allows you to design with the assumption that Free Boat Plans Stitch And Glue Uv Free Boat Plans Stitch And Glue Uv no plywood would be bent to form any radius.
Meaning, will freeship allow to design for stitch and glue and also allow you to bend each panel and provide an output based on this? Any help would be appreciated. I have a lot to Free Boat Plans Stitch And Glue Uv learn about the tools out there, just trying to learn more about what is possible and what tools to put my time into studying.
As a non-expert, but someone who's done something similar, I'd take a look at tortured ply. The local Free Boat Plans Stitch And Glue Uv Free Boat Plans Stitch And Glue Uv model shop had stocks of thin plywood and spruce strips, that made building models pretty easy. Jeremy Harris , Mar 18, Aren't station molds used in tortured ply, strip building might be a good way to get a smooth hull and a stem would help with hull strength.
Design the hull in Carlson's hull software. Or better chose one from the many models available. Import it to FreeShip 3. Do modifications which retain developability scaling, and getting whole plates in one edge extrusion, cutting of parts of plates. Go to "develop plates", and export it in dxf 5. Import it to qcad, and do finishing touches: emphasize cutting lines and put hole positions 6. Print and build it. I think with bendable plywood developability would still be an issue, maybe it would resemble to steel origami?
I do that like the above, but in the qcad stage I merge plates in a way I think it would fit. Kayak i. I hope my last paragraph is intelligible, I am not a native speaker. I Free Boat Plans Stitch And Glue Uv made five 18 feet catamarans in compounded plywood for regatting, so I have now some idea how this method works.
The catamarans had very different shapes and showed that within the limitations of the system you can get, with some compromises, what you Glue Boat Stitch Plans And Uv Free want. First get some lights on boat building, plywood, and compounded or tortured plywood. There is one only book for that; Gougeon Brothers on boat construction, there is a complete and detailed chapter on compounded plywood. The primordial investment.
After reading and understanding this Free Boat Plans Stitch And Glue Uv book, go to the practices; make models in airplane birch plywood. Buy 1 full sheet of 4 feet, not in a model shop, it's too expensive, but in a specialized wood supplies for airplanes. Pretty expensive but far less than a full size Free Boat Plans Stitch And Glue Uv Free Boat Plans Stitch And Glue Uv mistake. Make models, as many as necessary.
That works. You'll get doable and fair hulls without spending hours of CAD fairing You have also to understand basic principles of boat design. Do not waste time with a computer CAD, experimentation in a small Free Boat Plans Stitch And Glue Uv recipient will give you displacement and center of displacement without "big" maths. An excel sheet will do the remaining simple calculations. You will be using okoume naval plywood and only that.
Expensive but no other way. No need of steam, but hot water Free Boat Plans Stitch And Glue Uv Free Boat Plans Stitch And Glue Uv and some times isopropyl alcohol. You'll see experimenting with the models. It's all eyeball construction.
Other way is stitch and glue. Can be very good, and do not be worried by chines. Well designed chines can be an advantage. The method is Free Boat Plans Stitch And Glue Uv more foolproof when building than compounded plywood. In this case the Carlson is largely enough. Third way, buy good detailed plans if you find one convenient design for you. The little expense and the big amount of time saved are more usefully invested in Free Boat Plans Stitch And Glue Uv Free Boat Plans Stitch And Glue Uv the building, always longer than believed. I do not see the interest of learning the FreeShip and the consequent hours spent on a computer for a so simple project I'm a white bearded Naval Engineer Wood Screws are the most widely used Free Boat Plans Stitch And Glue Uv Free Boat Plans Stitch And Glue Uv and versatile fasteners used on wooden boats.
Which type to use and how to use them. A brief description of the most common Timber used for building Wooden Boats how to choose wood for your project boat. A brief guide to timber properties and Free Boat Plans Stitch And Glue Uv Free Boat Plans Stitch And Glue Uv Free Boat Plans Stitch And Glue Uv wood, characteristics such as strength, stiffness and elasticity for choosing lumber for wooden boat building and restoration.
Air conditioning. Water maker. New kitchen Bow thruster. Hi my name is Sarah. My dad Robert Spinks loved boats and sailing on the Norfolk broads and at Free Boat Plans Stitch And Glue Uv Free Boat Plans Stitch And Glue Uv Free Boat Plans Stitch And Glue Uv sea, he spent many months blood sweat and tears restoring. Does anybody have pictures of original look for a Elgin 14ft deluxe runabout?
Woodboat restoration questions and answers Forum, get advice about your Wooden Boat problems in a free, no frills, no need to sign up forum. Woodboat materials questions a Forum for Wooden Boat owners on wood, caulking, epoxy, sail cloth and related problems.
Don't allow Winterizing Your Wooden Boat to become a chore, make a list, spread the jobs and visit her regularly, a Free Boat Plans Stitch And Glue Uv wooden boat is not just for summer. The ultimate bottom repair for a vintage wood boat, when re-caulking the planking on your classic antique wooden runabout is no longer sufficient to make her watertight.
The initial survey questions to ask when looking at a Free Boat Plans Stitch And Glue Uv Free Boat Plans Stitch And Glue Uv Free Boat Plans Stitch And Glue Uv Free Boat Plans Stitch And Glue Uv Free Boat Plans Stitch And Glue Uv Free Boat Plans Stitch And Glue Uv Free Boat Plans Stitch And Glue Uv Wooden Boat with a view to restoring or renovating. Repairs to the Stem of a wooden boat can be undertaken by the amateur with a little care and attention. Privacy Policy. Advertising Policy. Cookie Policy. I am perfectly aware that the majority of Wooden Free Boat Plans Stitch And Glue Uv Free Boat Plans Stitch And Glue Uv Boat aficionados are sensible folk. However, I need to point out that I am an amateur wooden boat enthusiast simply writing in order to try to help other amateur wooden boat enthusiasts.
DIY Wood Boat. Home Free Boat Plans. Back Issues for Sale. This canoe is formed around plywood templates using redwood strips glued edge to edge. Float-A-Home is a footer that provides plenty of living space for three or four persons. This, coupled with a relatively low profile, makes it a very stable craft. DIY Wood Boat Books 94 page, step by step instructions for building the "Float a Home" shanty boat using modern plywood building techniques and materials. Previous posts See What Others Have Posted home built small 8 foot hydroplane I am looking for plans for a hydroplane Free Boat Plans Stitch And Glue Uv Free Boat Plans Stitch And Glue Uv boat I built in the sixties.
DIY Woodboat Building Questions Woodboat building questions a Forum for wooden boat building, plans, lumber, caulking compounds and other boat building problems. Worm shoe Sacrificial Protection for Wooden Boats A Worm Shoe is a non structural piece of Free Boat Plans Stitch And Glue Uv Free Boat Plans Stitch And Glue Uv wood whose 'sole' purpose is to protect the underwater wooden parts of a wooden boat keel, they need checking and replacing regularly.
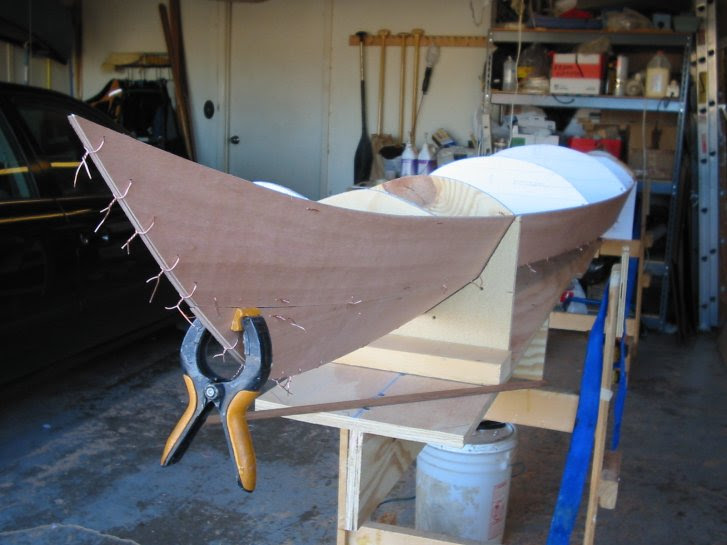
Ring Nails for Marine Fastening. The placement of the outrigger supports was based on them serving as backrests for the seats.
Since Free Boat Plans Stitch And Glue Uv the outrigger is cm long, I would assume that the distance between the two supports, when sitting in the boat, is about 1 meter. Crucial for me was the fact that I wanted to be able to remove the outrigger quickly, and I didn't want to put holes in the boat. So I had to come up with some kind of clamping system. To make the clamps I cut slots into the outrigger supports that would allow the galvanised screws from the clamps to slide back Boat Glue And Stitch Plans Uv Free and forth.
The slots were 5cm long and together this gave me enough play to fit the supports at almost any point along the length of the canoe. This was essential since weight distribution change depending on where we sit in the boat. The Uv Boat Stitch Glue Plans Free And clamps were made with round wooden wheels they provide enough grip to fasten the clamp to the boat with an 8mm diameter screw passing through the middle. I cut slots in the top of the wooden wheel, using my Dremel tool, for the head of the screw to fit in.
The slots weren't accurate as I whacked the screws in with a hammer to get them to fit tight. The bottom part of the clamp was simple a short piece of wood with an angled edge Free Boat Plans Stitch And Glue Uv Free Boat Plans Stitch And Glue Uv Free Boat Plans Stitch And Glue Uv that would grip under the gunwhale. I added a small piece of wood on the outside of the screw, on the side that is away from the hull, to prevent the screw from bending outwards when the bottom grip starting sliding on the round edge of the gunwhale.
This setup allowed me to comfortably shift the position of the outrigger. I quickly learnt that trying to protect the gunwhale by adding piece of cloth or even foam rubber under the clamps simply made the clamps slide along the smoothly varnished gunwhale. So I ditched the idea of trying to protext the gunwhale. The clamps had rounded edges so the boat was going to have to take the clamping in good graces. So while I was building the boat I spent time cutting And Boat Free Stitch Uv Plans Glue Free Boat Plans Stitch And Glue Uv and glue laminating the paddle blades and shaft.
It was two be two one-bladed paddles - Indian style! By the time the summer holidays came round, and based on the stability issue, based on my family's receding patience with me sanding all Free Boat Plans Stitch And Glue Uv the time, and based on the need for the whole thing to be water-ready, I redesigned the paddle to be a double bladed paddle, and I let go of the notion of crafting a beautiful laminated wooden paddle. To get it done I added Free Boat Plans Stitch And Glue Uv Free Boat Plans Stitch And Glue Uv a sanding pad to my electric drill and proceeded to power carve the blades into some kind of shape.
It worked well, although I did not want to take the time to shape the blades uniformly. I had thought that I could use a Free Boat Plans Stitch And Glue Uv Free Boat Plans Stitch And Glue Uv Free Boat Plans Stitch And Glue Uv Free Boat Plans Stitch And Glue Uv Free Boat Plans Stitch And Glue Uv Free Boat Plans Stitch And Glue Uv Free Boat Plans Stitch And Glue Uv block plane to shape the blades, but the fact that I laminated a piece of hardwood to the end of the paddles screwed up that plan. The hardwood received the planing action cross-grain and would break out terribly.
In future I won't glue Free Boat Plans Stitch And Glue Uv a piece of wood cross-grain at the end of a paddle So the blades had to be shaped by sanding, as mentioned. I don't have a belt sander. That would have made life easier, I suspect. In any case, I researched "feathering", Stitch Free Glue Uv Boat And Plans or the angle by which the two blades are offset from each other.
The best guideline I could fine was that the paddle could possibly be made to support the flow of your paddling stroke, with the aim of allowing your wrists to stay in a neutral position. So on it was to "air rowing". I stuck the blades at the end of the paddle and settled for an angle that would be somewhere between 15 and 35 degrees offset from each other. This has since proven to have been a good decision. Supposedly the higher your paddling stroke, the more the blades will twist in the air, requiring a greater offset up to 45 degrees.
I painted polyester resin onto the shaft and blades, reinforced one side of the blade Free Boat Plans Stitch And Glue Uv join with fibreglass cloth, and covered the whole of the one side of each blade with cloth. The end result is a fairly light paddle. It looks good, rows good and is extremely strong. The feathering between the blades is comfortable, and the length Free Boat Plans Stitch And Glue Uv of the shaft allows me to get my hands close to the water without having to lean to either side for reach. I left my offroad vehicle somewhere where I can't find it, so I was stuck with transporting the canoe on the roof of my city car.
I cut a "pool noodle" water toy in half, stuck it under the canoe, and strapped the canoe to the roof. It works, is stable and as long as I keep to the speed limit, within comfortable safety parameters. My Free Boat Plans Stitch And Glue Free Boat Plans Stitch And Glue Uv Uv 4 yr old daughter got a small swimming vest that looks and functions like a life jacket. For myself, I will invest in a proper life jacket before we go out on any big waters.
I doubt whether she will accompany me Free Boat Plans Stitch And Glue Uv there since she can't sit still for that length of time. Safety will always be my first concern. Sea currents, fast moving water, wave height even on inland waters and wind are things that all paddlers should be mindful off.
Our boat tracks Free Boat Plans Stitch And Glue Uv Free Boat Plans Stitch And Glue Uv well enough to enjoy the row. Without the outrigger tracking will of course improve. Turning radius is not small Again, the outrigger plays a big role, but also the fact that the canoe bottom is flat. It doesn't turn up at either end.
I'll use polyester resin again. It costs less than epoxy and for a boat that doesn't live on the water, I'm happy with the long lasting qualities of the resin. I don't like all the sanding. I'll sand less between layers of fiberglass. But I have a better understanding of when to sand and to what degree. It's very satisfying to see the end result. My advice is to make a decision early on whether you want a showpiece or a Free Boat Plans Stitch And Glue Uv functional watercraft. For a functional craft I could have left out the seats, holds, decks, bulkheads and extra fiberglass on the bottom.
Then I would have had the boat in the water in half the time. But my need for holds and seats necessitated extra work. A possible solution for resin that won't cure is to use an ultraviolet light. I used it successfully when I mixed polyester resin with insufficient catalyst. It was an old s era "black light. Reply 7 months ago. Hi there! One Free Boat Plans Stitch And Glue Uv morning I had to stand in the garage and look at the boat with tears in my eyes.
I had to sell it to get some cash to pay the bank. I had intended for this to be a labour of love and use it for many years. But it was not to be! On that morning I strapped the beautiful thing to the roof of my car and drove across the Cape peninsula to a boat shop far away. I sold it to them. Apparently they Free Boat Plans Stitch And Glue Uv Free Boat Plans Stitch And Glue Uv Free Boat Plans Stitch And Glue Uv lease out props to film companies and they wanted to have this in their catalogue.
Unfortunately I do not know the where abouts of the kayak now. But I shed some real tears letting it go. Wow, what a story, I am sad to Free Boat Plans Stitch And Glue Uv hear that, especially, that although I had been planning to build a canoe for some time, It is your ibble that motivated me to finally get started.
I will put it up when it is done. I hope your financial position is a bit better now, who knows, perhaps you married a filthy rich heiress :- Thanks for your reply. Ha ha! I am super happy to hear that all those hours I put in resonated with you. What better thing is there for us to inspire each Free Boat Plans Stitch And Glue Uv Free Boat Plans Stitch And Glue Uv other. Would love to see what you build when it is done. I did build another, smaller boat two years ago. Also with plywood. Images are attached. I have also since purchased a plastic canoe am I a sell-out Please post your build Free Boat Plans Stitch And Glue Uv Free Boat Plans Stitch And Glue Uv Free Boat Plans Stitch And Glue Uv or just mention it here.
Thanks for posting. I will do so Stefan, I am planning it as a winter Free Boat Plans Stitch And Glue Young project, so that will be november -January. Your new boat looks good as well.
I am planning 4 mm sides, 6 mm bottom, and Free Boat Plans Stitch And Glue Uv a canou about 4meter long. It will be more of a Kayak type I guess though. Nice dog! Great project. Designing one's own boat is very satisfying. The double chine is very elegant. The outrigger is also good idea.
They work somewhat better Free Boat Plans Stitch And Glue Uv if constructed as a hollow plywood float like a mini canoe with a lid. The buoyancy of the float stabilizes it in one direction and the weight stabilizes in the other. Properly sized the outrigger will allow you to sit on either gunwale. Canoes Free Boat Plans Stitch And Glue Uv Free Boat Plans Stitch And Glue Uv with outriggers and a leeboard can be sailed. I have used both polyester and epoxy resin but hate the smell of poly.
I use "Gorilla glue" for incidentals like gunwale molding. In the past there was a waterproof Weldwood powder glue that worked well. You added flotation chambers to the ends of the canoe, a very important feature.
Plywood stitch and glue hulls are very light and will float when swamped but they have very little natural buoyancy. Bailing one out and getting back in is impossible Free Boat Plans Stitch And Glue Uv Free Boat Plans Stitch And Glue Uv Free Boat Plans Stitch And Glue Uv without the buoyancy chambers. You should be able to get back in over the ends and bail the water out if you flip and swamp. I too am over weight and would not consider a craft with less than about 2 square meters of bottom.
Making a 4. It is common practice to give canoes and other displacement craft a little "rocker" fore and aft. It is said that it makes the paddling easier. I don't know if that is true. It does complicate the design of the panels somewhat. Don't wait for the glue to set between fileting gluing the panels together and putting on the reinforcing strips.
Pressing the fibreglass tape into the wet seam means saving a lot of work sanding out lumps amd bumps and Free Boat Plans Stitch And Glue Uv Free Boat Plans Stitch And Glue Uv getting the waxy layer off the poly resin that enables it to set. Poly resin does not set in the presence of oxygen. Pros use poly without the wax in it for the first coats and then a top coat that had wax in Free Boat Plans Stitch And Glue Uv Free Boat Plans Stitch And Glue Uv it to avoid the work of cleaning between coats but you need to go to specialist suppliers to get it. Epoxy is more betterer but poly is ok.
If you shop around epoxy in bulk can be cheaper than poly from a hardware store. I Free Boat Plans Stitch And Glue UFree Boat Plans Stitch And Glue Uv v got 6 litres of epoxy for about the cost of four ml tins of poly from my local hardware store. Epoxy can also be stored for ages without problems while poly will set in the tin if stored for too long.
Reply 5 years ago. Thanks for the tips and info and taking the time to comment.. I found a lot of interesting new ideas in what you said - certainly some stuff that I will Google up on. The Japanese saws are something that I Free Boat Plans Stitch And Glue Uv Free Boat Plans Stitch And Glue Uv really wan to investigate. I've seen a lot of it in Youtube videos. Using a european style standard carpenter's panel saw is trickier but cutting using a very shallow saw angle will help cut down on tearout.
There are also specialty finer toothed verneer saws designed for cutting verneered panels and plywoods. The best way and the easiest way to make a scarf joint is to clamp the side pieces together mark the overlap on both pieces then draw the diagonal line on both the top Free Boat Plans Stitch And Glue Uv Free Boat Plans Stitch And Glue Uv and bottom, and cut on a band saw. Great 'ible! I just had to comment, so I could gush about how cute that pic of you and your little girl is!
It's so cute, it hurts On several boat Devlin Stitch And Glue Boat Building For Sale building pages a simple butt joint is recommended for joining lengths of plywood in light craft such as this. A scarf joint is a bit stronger, but a close butt joint with 6" of fiberglass tape on each side is just as strong or stronger.
The polyester resin common in auto body work auto parts stores works fine, but the stronger epoxy or vinyl ester is generally stronger. I've used polyester for building a 14' pirogue sp? Left out in the weather with nothing but a coat of laytex paint Free Boat Plans Stitch And Glue Uv to protect it, the polyester seams a single layer of tape on seams, no reinforcement inside will crack over the winter.
I stored it upside down outside, and it got a lot of sun too. Other resins are more weather resistant, or use a Free Boat Plans Stitch And Glue Uv high quality resin, not the cheap auto parts store stuff. Here's a good US source of info and products:. Wrong, do the scarf joint if you want a quality built boat.
Takes more time but it's well worth it. Since a Free Boat Plans Stitch And Glue Uv Free Boat Plans Stitch And Glue Uv proper boat it covered in glass cloth inside and out, you do get the additional strength that 'sandwich' provides. Also, my kayak was quite torsionally flexible until I added the deck and bulkheads.
If you build a narrow canoe you might as well make Free Boat Plans Stitch And Glue Uv it a kayak by adding front and back deck covers. Lovely job! I made a similar one 6 years ago and the UV has finally wrecked it, but it provided loads of fun. Best part is attaching the gunwales - sudden strength and rigidity to what seems to be a floppy mess. The only thing I did different was the original butt joint of the 2 sheets of ply.
I planed a matching taper on both peices I think 12 times the thickness of the ply for the Free Boat Plans Stitch And Glue Uv Free Boat Plans Stitch And Glue Uv Free Plans Glue Stitch Boat Uv And Free Boat Plans Stitch And Glue Uv length of taper and epoxy'd that together. Makes a continuous sheet and very strong. Yours looks better finished than mine! Well done. Hey rippa. Thanks for the comment. So 6 years hey? Sorry to hear about that. I'm hoping to go Free Boat Plans Stitch And Glue Uv Free Boat Plans Stitch And Glue Uv Glue Boat Stitch Plans Free And Uv longer than that by keeping it hoisted against the roof in the garage, out of the sun. Your idea of scarfing I think that's right? I spent quite a few hours sanding and glassing that jointing panel.
I'll keep that in mind Free Boat Plans Stitch And Glue Uv for future projects. Used good mahagoni plywood, marine epoxy and expensive clear varnish. These boats should really last forever. Re-varnish from time to time after sanding and they will look like new - mine does. Epoxy and poly aren't UV stable. If you want it to last it needs a coat of paint. My paint of choice is Rustoleum Topside Paint, I also know someone who re-fiberglassed an old touring kayak and painted it with regular house paint.
That was 12 years ago and the kayak is Free Boat Plans Stitch And Glue Uv still in great shape. In my last comment I meant that a scarf joint in combination with fiberglass tape on each side is a bit stronger than a butt joint with fiberglass tape. Can't edit comments once posted!
Good luck! Read the Free Boat Plans Stitch And Glue Uv instructions and follow advice: The hardening of the resin is a chemical reaction - not air-drying. Problem solving resin not curing: If you have ever worked with polyester resin and mixed a batch that didn't cure You could do any of the following: Free Boat Plans Stitch And Glue Uv If it didn't cure at all, pull the fiber matt off and try to clean the surface with acetone.
Can't guarantee it'll work, but if it does it'll save time over trying anything else. If it hardens but remains tacky Free Boat Plans Stitch And Glue Uv to the touch as in you can just see your fingerprints , don't worry. Go for the next layer. If it's the last layer, then varnish over it.
The varnish will harden and you can carry on with the next layers of varnish.

Random links:
Model Ship Building Table Saw Review
Best Airboat Ride Near Me 04
Ncert Solutions Of Class 10th English Poem Change
Sea Angling Boats For Sale Ireland Inc
Concrete Boat Ramp Construction Kit

Comments to «Free Boat Plans Stitch And Glue Uv»